Tuesday, December 30, 2008
The Seattle Chocolate Scene: I am SO there
Speaking of chocolate boxes, one particular epicenter of Northwest chocolates is the Chocolate Box, located on Pine Street just across the street from the famed Pike Place Market. It is here that one can find the entire range of local chocolates from a selection of both renowned and up-and-coming chocolatiers.
To me, the shop is slightly Willy Wonka-esque in the variety of chocolate products to sample: there is everything from the elegant truffle to Aztec spicy hot chocolate to the grand red velvet cake. Even those in need of a gluten-free sugar fix can find something for their fancy here, and the crowd at any given moment ranges from delighted children who, incidentally, are excited to be in a candy shop, to curious tourists interested in picking up a piece of Seattle to bring back to their hometowns, to the local businessperson whom the baristas recognize and greet with a familiar smile and their regular mocha espresso order ready at the counter.
Once the initial overload of chocolatey sensation passes (first there is the smell, then the sight, then – inevitably – the taste), one is able to calm salivation and bring focus to what each local chocolatier has to offer. And that selection is vast.
Here's a brief rundown of some of the Chocolate Box mainstays.
Theo Chocolate: the first roaster of Fair Trade Certified cocoa beans and the only roaster of organic cocoa beans in the United States, conveniently located in the Fremont section of Seattle.
Fiori Chocolatiers: Specializing in the truffle chocolates, they create unique Italian-style confections in small, carefully tended batches.
Chocolate Vitale: Using old family recipes, they manufacture startlingly decadent chocolate drinks like European sipping chocolate and Chocolate crème tea.
Oh! Chocolate: Beautifully made artisan chocolate pieces made with premium chocolate, in the French tradition.
In browsing the shelves, one will find a variety of other local chocolates in bar form, nib form, powder form...nearly every form imaginable. There are sea-salt caramels and actual sugar plums and white chocolate made from San Francisco goat's milk. Novelty chocolate box sets sport Barack Obama's face, and one can sample chocolates with names like “burnt brown sugar” and “Sri Lanka Curry.” Of course, there is also a veritable mountain of plain, old-fashioned chocolate, in nearly any cacao percentage one can dream of, all the way to Theo's incredibly earthy 91% cacao chocolate bar.
It's not simply that I love chocolate or that I might as well build a shrine to sugar in my apartment; a place like the Chocolate Box goes beyond offering rain-dampened customers with a warm drink or satisfying chocolate bar. This chocolate shop is a celebration of a very local, very fine market of chocolates that oozes the character of the Pacific Northwest. Sampling a confection here is not merely eating a piece of chocolate, but it truly is partaking in a piece of Seattle.
Wednesday, December 10, 2008
Wait, one more cookie recipe!
I had always been slightly hesitant to try baking filled cookies, because similar to pie or cheesecake recipes, I have been burdened with the preconceived notion that they are difficult, complicated, and take much too much time to put together. Of course, I'm very wrong in that assumption, and I'm glad that I had this recipe around to set me straight.
The cookies and the filling are pretty straightforward to create and assemble. The recipe also has the added benefit of getting my hands dirty with dough in order to put together the final product. If I can stick my hands in it, and work with the dough myself without the aid of a spoon or mixer, then I know I've given a little bit extra to my cookies, and likely that I enjoyed the preparation even more. And it was fun to put together these cookies. It helped, of course, that they yielded scrumptious results. I refrained from over stuffing the cookies with peanut butter filling, but I used just enough so that every bite would deliver at least a tiny amount of peanut butter, which is what really makes the cookies stand out. Though the chocolate part is also delicious, it is a basic dough, and really benefits from a little something extra. The granulated sugar added at the very end, on the bottom of a glass or spoon, also gives the cookies an air of holiday festivity, which makes them a perfect addition to the Christmas Cookie Lexicon.
Peanut Butter Munchies
Ingredients:
1-1/2 cups all-purpose flour
1/2 cup unsweetened cocoa powder
1/2 teaspoon baking soda
1/2 cup butter, softened
1/2 cup granulated sugar
1/2 cup packed brown sugar
1/4 cup peanut butter
1 egg
1 tablespoon milk
1 teaspoon vanilla
3/4 cup sifted powdered sugar
1/2 cup peanut butter
2 tablespoons granulated sugar
Directions:
1. Preheat oven to 350 degrees F. In a medium mixing bowl stir together flour, cocoa powder, and baking soda. In a large mixing bowl beat together butter, the 1/2 cup granulated sugar, brown sugar, and the 1/4 cup peanut butter with an electric mixer until combined. Add egg, milk, and vanilla; beat well. Beat in dry ingredients with mixer. Form chocolate dough into 32 balls about 1-1/4 inches in diameter. Set aside.
2. For peanut butter filling, in a medium mixing bowl combine powdered sugar and the remaining 1/2 cup peanut butter until smooth. Shape mixture into 32 (3/4-inch) balls.
3. On a work surface, slightly flatten a chocolate dough ball and top with a peanut butter ball. Shape the chocolate dough over the peanut butter filling, completely covering the filling. Roll dough into a ball. Repeat with the remaining chocolate dough and peanut butter filling balls.
4. Place balls 2 inches apart on an ungreased cookie sheet. Lightly flatten with the bottom of a glass dipped in the 2 tablespoons granulated sugar.
5. Bake cookies in preheated oven for 8 minutes or until they're just set and surface is slightly cracked. Let cookies stand for 1 minute. Transfer cookies to wire racks; cool.
Saturday, December 6, 2008
On hiatus for the big move
This year, however, there is a significant change in plans. Instead of cheerfully cloistering myself in my kitchen, I'm packing up my belongings and moving to Seattle. In just a little more than a week, I'll officially give up my identity as a Brooklynite and begin the transformation into a Seattlite, a change for which I'm thoroughly thrilled. But, because a cross-country move is quite...involved, I won't be able to bake my treasured array of Christmas cookies, and therefore, will not be able to blog about them.
Once everything comes together, I'm hoping to have a fully stocked kitchen and a new assortment of taste-testers for my recipes, but in the meantime, the best I can do is report on the Seattle bakeries that I fully intend on patronizing. That, and offer some links to the cookie collections that I would be creating if not for this change of scenery.
Happy baking!
The Food Network's 12 Days of Cookies
Martha Stewart's Cookie of the Day
Betty Crocker's Cookie Exchange
Epicurious' 25 Days of Christmas Cookies
Better Homes and Gardens' Cookie Exchange Favorites
Friday, November 21, 2008
Chocolate Chip Cookies like the Bakeries Do Them
In reality, though, this is not entirely the case. Yes, there are singularities to these behemoth cookies, but once the secret is known they are exceedingly simple to make at home. The only thing that really needs to be done is a small adjustment of ingredients.
That’s what I did with these extra-large chocolate chip cookies, slightly modified from a recipe on Baking Bites. The secret is in the extra helping of brown sugar and vanilla extract, with a decrease in granulated sugar making them richer than the average cookie. The cooking time is also increased, in order to thoroughly bake through, and I allowed the cookies to cool on the baking sheet for a few minutes longer than I would normally allow before transferring them to wire sheets. For my trial recipe, though, I used one part applesauce to one part butter, as I sometimes experiment with when it comes to chocolate chip cookies, in order to see how the consistency would be affected. As a result, my cookies did not spread as wide, but they still had a wonderful chunkiness and chewiness that I find very appealing in the bakery style cookies, but without so much of a buttery taste.
Yield: 2 dozen
Ingredients:
1 cup butter, room temperature
2/3 cup sugar
2/3 cup brown sugar
2 tsp vanilla extract
2 large eggs
2 1/4 cups all purpose flour
1 tsp baking soda
1 tsp salt
1 1/2 cups Rice Krispies/puffed rice cereal
2 cups chocolate chips
Directions:
Preheat oven to 350F and line a couple of baking sheets with parchment paper.
In a large bowl, cream together butter, sugars and vanilla extract until light and fluffy. Beat in eggs one at a time.
In a medium bowl, whisk together flour, baking soda and salt. Stir the flour mixture into the sugar mixture, followed by rice krispies and chocolate chips.
Using a 1/4 cup measure as a spoon, drop 1/4 cup scoops of cookie dough onto the prepared baking sheets. Leave at least 4 inches between cookies to allow for spread (I put 5 or 6 on a sheet). Cookie dough should be shaped in the 1/4 cup measure, not in a round ball (as this results in the most even baking).
Bake for 13-16 minutes, until cookies are golden at the edge. Remove from oven and let cookies set on cookie sheet for 6-10 minutes before transferring to a cooling rack.
Wednesday, November 19, 2008
Potato Chips and Cookies, Together at Last
When it comes to food, I try my best to be adventurous. I see nothing wrong in sampling a dish that has a strange description or a smattering of unusually paired ingredients, if for no other reason than to say that I tried it. This was the case when I bought a Vosges Bacon Chocolate Bar or when I ordered Egg Cream gelato at Grom in Greenwich Village. So maybe I'm mainly exploratory when it comes to sweets, but to be fair, I go out for dessert much more often than I go out for a regular meal. But I still spend a good amount of time in the kitchen, and I've been thinking that my confectionary open-mindedness should extend beyond what other chefs are trying and into my own repertoire. Which is why I was pleased to have found a cookie recipe that I had not seen before; I had not seen even similar types of cookies in the past. The name "Potato Chip Cookie" is, to me, not very appetizing, but only because I'm not a fan of potato chips in general. However, when I thought about it, I love chocolate covered pretzels, with the mixture of sweet and salty, and so perhaps potato chips in cookie dough would not be so far-fetched. The final product turned out quite well, in my opinion (and the opinion of my co-workers!). The potato chips gave the cookies a bit of extra fluffiness but they did not give themselves away: as unwitting tasters tested the cookies, none were able to identify the secret ingredient, but many agreed that it had a "familiar" flavor. Additionally, the dough is of the standard, buttery variety and is difficult to do much harm to. Personally, these are not my favorite cookies; I found the combination of butter and potato chips to be slightly overwhelming. However, they were a real crowd-pleaser with their crunchy mystery ingredient.
Potato Chip CookiesYield: About 3 dozen
Ingredients:2 cups all purpose flour
1 tsp baking soda
1/4 tsp salt
1 cup butter, room temperature
1 cup sugar
1 large egg
1 - 1 1/4 cups crushed potato chips
Preheat oven to 350F. Line a baking sheet with parchment paper.
In a large bowl, cream together butter and sugar until fluffy, then beat in the egg.
In a medium bowl, whisk together flour, baking soda and salt, then stir into butter mixture. Stir in potato chips.
Drop tablespoonfuls (1-inch balls) of dough onto prepared baking sheet, leaving about 2-inches between each cookie to allow room to spread.
Bake for 12-15 minutes, until light golden.
Cool completely on a wire rack before storing in an airtight container.
Monday, November 10, 2008
Dessert Cornucopia: A Good-bye Feast
Dessert Cornucopia: Valrhona Chocolate Brownies
Valrhona Double Chocolate Brownies
Ingredients:
1 stick unsalted butter
½ cup all-purpose flour
½ cup good quality unsweetened cocoa powder, such as Valrhona
1 cup sugar
1 tsp. salt
2 large eggs, beaten
1 tsp. vanilla extract
½ cup coarsely chopped semi-sweet chocolate
Directions:
1. Preheat the oven to 350°. Grease a 9 x 9 inch baking dish.
2. Melt the butter in the microwave (about 45 seconds, but watch to be sure).
3. In a large mixing bowl, combine the flour, cocoa powder, sugar, and salt.
4. Add the eggs, melted butter, and vanilla to the dry ingredients and continue to mix until well combined (but do not overmix). Finally, stir in the chopped chocolate.
5. Pour the batter into the prepared baking dish and bake for 30-35 minutes, or until a toothpick inserted into the center comes out clean. Let cool.
Dessert Cornucopia: Baby Cakes
Baby Cakes
Yield: About 48
Adapted from The Food Network
Ingredients:
Cakes:
1 ½ cups all-purpose flour
1 ½ tsp. baking powder
¼ tsp. fine salt
2 large eggs, room temperature
2/3 cup sugar
¾ cup unsalted butter, melted
2 tsp. pure vanilla extract
½ cup milk
Icing:
1 ½ cup confectioners' sugar
¼ tsp. vanilla extract
2 to 3 tablespoons milk
Directions:
1. Preheat the oven to 350°. Line the muffin tin with mini cupcake liners.
2. Whisk the flour, baking powder, and salt together in a medium bowl.
3. In another medium bowl, beat the eggs and sugar with an electric mixer until light and foamy, about 2 minutes. While beating, gradually pour in the butter and then the vanilla.
While mixing slowly, add half the dry ingredients, then add all the milk, and follow with the rest of the dry ingredients. Take care not to over mix the batter. Divide the batter evenly in the prepared tins (about 2 teaspoon batter per cup cake.)
4. Bake about 15 minutes. Cool cupcakes on a rack in the tin.
Icing:
Whisk together the confectioners' sugar and milk until smooth and sugar dissolves. Dip the tops of each cake in the glaze, sprinkle with sugar or top with tiny candies and let set.
Dessert Cornucopia: Gingerbread
Gingerbread
From Cooking Light
Ingredients:
1/3 cup granulated sugar
¼ cup stick margarine or butter, softened
1/3 cup molasses
1 large egg
1 ½ cups all-purpose flour
1 tsp. ground ginger
½ tsp. baking soda
¼ teaspoon ground nutmeg
1/8 tsp. salt
1/8 tsp. ground cloves
2/3 cup 1% low-fat milk
Cooking spray
2 tsp. powdered sugar
Directions:
1. Preheat oven to 350°.
2. Beat granulated sugar and margarine at medium speed of a mixer until well-blended (about 5 minutes). Add molasses and egg; beat well.
3. Lightly spoon flour into dry measuring cups, and level with a knife. Combine flour and next 5 ingredients (flour through cloves). Add flour mixture to sugar mixture alternately with milk, beginning and ending with flour mixture.
4. Pour batter into an 8-inch square baking pan coated with cooking spray. Bake at 350° for 30 minutes or until a wooden pick inserted in center comes out clean. Cool in pan on a wire rack. Sift powdered sugar over top of cake, and serve warm.
Friday, October 31, 2008
Candy, candy, candy!
Happy Halloween!
Hopefully they'll all enjoy the chocolate chip cookies that I made, and maybe one of them will have a recipe for Pan de Muertos, for tomorrow's Day of the Dead.
Monday, October 27, 2008
Mm, Mm, Molasses
Soft Molasses Drop Cookies
Yield: About 5 dozen
Ingredients:
3 ½ cups all-purpose flour
¾ cup sugar
1 tsp. ground cinnamon
1 tsp. ground ginger
¼ tsp. salt
¾ cup molasses
¾ cup (1 ½ sticks) unsalted butter, softened
1 egg, lightly beaten
1 ½ tsp. baking soda
½ cup hot milk
Directions:
1. Preheat the oven to 375 degrees F. Lightly grease baking sheets with baking spray.
2. Combine the first eight ingredients, in the order given, in a large bowl and stir to mix.
3. Stir the baking soda and the hot milk together and add to the flour mixture. Stir well until fully combined. Scoop out the dough by tablespoons and drop about 2 inches apart on the prepared baking sheets.
4. Bake 12-14 minutes until dry but still soft. Cool on the baking sheets for five minutes, then transfer to wire racks to cool completely.
Sunday, October 19, 2008
Honey Wheat Bread that did not turn out so sweet
I like to call this time of year the beginning of hibernation season. Already, my slippers have replaced the flip-flops sitting by my front door, the giant fleecy blanket has taken up residence on my futon, and my jar of hot-chocolate mix is sitting on my counter top. I know that we're only awaiting even colder weather, of course, but I'm trying to ease into it. And this weekend has truly been a pleasant help with that: a cool crisp bite to the air, a clear blue sky, a sun that made its presence known without any overbearing heat. Although I chill easily, the only two complaints I have about our autumn are the the swiftness of the sunsets and the shortness of the days...all the less time to enjoy them! But I suppose if I really want a lesson in darkness, I should spend some winter time in Alaska.
Anyway, when I get into my hibernation mode, I don't think I'm alone in the fact that warm, soothing recipes are at the top of my must-try list. When I woke up this morning, I was all set with a pan to make a loaf of Honey Whole Wheat bread. I eagerly anticipated how the aroma would emanate through my apartment and how satisfying a slice would taste with a glass of milk.
Unfortunately, I did something terribly wrong, and even now, I'm not exactly sure of what that might have been. I think perhaps that I did not work with the yeast correctly, or maybe I didn't heat the other ingredients to the right temperature. My guess is that I did something wrong with the yeast; my dough refused to rise at all, even after an hour spent in my oven (not turned on, but always warmed) in hopes of rising. Because of this, I wasn't able to continue with baking, which was a big disappointment. But also within it is a good lesson: though not as much or as frequently with cooking, recipes in baking are finicky and demand precision. If one is too busy reading the first issue of The Food Network magazine to pay careful attention to the mixing bowl in front of her (as a certain baker might have been this morning) then one's Honey Whole Wheat bread might not turn out well.
Well, I seemed to have failed as a baker today. But I do think that this recipe will yield yummy results, and I will try it again sometime soon, myself.
Honey Whole Wheat Bread
Ingredients:
3/4 cup warm water
1 (.25 ounce) package active dry yeast
3/4 cup warm milk
2 tablespoons honey
2 tablespoons vegetable oil
1 teaspoon salt
2 1/2 cups all-purpose flour
2 cups whole wheat flour
Directions:
Place the warm water in large bowl. Sprinkle in yeast, stir until dissolved and let stand until creamy. Add the warm milk, honey, oil, salt, and 1 1/2 cups all-purpose flour; blend well. Stir in whole wheat flour and mix well. Add the remaining all-purpose flour, 1/2 cup at a time, until the dough is soft and workable (there may be some flour left over).
Turn the dough out onto a lightly floured surface and knead until smooth and elastic, about 6 to 8 minutes. Place in a lightly oiled bowl and turn the dough to grease the top. Cover the bowl with a damp cloth and let rise in a warm place until doubled in volume, about 1 hour.
Lightly grease a 9x5 inch loaf pan. Punch the dough down and turn onto a lightly floured surface. Form dough into a loaf and place into the prepared pan. Cover and let rise in a warm place until doubled in size, about 45 minutes. Preheat oven to 375 degrees F (190 degrees C).
Preheat oven to 375 degrees F (190 degrees C).
Bake in the preheated oven for 35 minutes or until top is golden brown and the bottom of the loaf sounds hollow when tapped. Remove loaf from the pan and cool on a wire rack.
Monday, October 13, 2008
Halloween Cookies: Oreos, M&Ms, Chocolate Chips
I also love M&Ms, but I eat these candies throughout the year, no matter what color combination the Mars company has decided would sell more bags to unwitting consumers.
So given these two sugary fancies, along with my obsession with chocolate chip cookies, one can only imagine the thrill I felt when I was scrolling through the posts on Cookie Madness and found this recipe for chocolate chip cookies with Halloween Oreos and Halloween M&Ms. Toward the end of my preparation, when all of the ingredients sat in the bowl, ready for the final mixing, I noticed how festive these cookies appeared, and how decorative they would look on the buffet table at a kid's Halloween party or at a school's October bake sale. With the bright colors and the familiarity of the ingredients, I could see just how whimsical a tray of these cookies would be for a group of little kids; I also recognized my own excitement at this Halloween-themed cookie. So many of the seasonal desserts I see involve massive decoration, and really seem to come together with the finesse of the final decoration or construction. Being a slightly less-than talented artist, I was pleased to find a holiday treat that I would be able to make without the fear of frosting muddled Frankensteins or vampires or witches.
And beyond the playful colors of the final product, these cookies are delicious as well. To give fair warning, though, they are quite sugary (hmm, how could that be?) and could easily put one into a cookie coma with just two or three helpings. But since we are approaching Halloween, it seems safe to assume that most of us will be in sugar shock soon enough anyway.
Halloween Chocolate Chip M&M Oreo Cookies
Yield: About 30 cookies
¾ cup unsalted butter, softened
½ cup granulated sugar
½ cup plus 2 tablespoons light brown sugar
2 teaspoons vanilla extract
1 large egg
1 teaspoon baking soda
1 teaspoon salt
½ teaspoon baking powder
½ teaspoon cream of tartar
2 cups all purpose flour
1 cup Halloween M&M candies
1/2 cup semi-sweet chocolate chips
6-8 Oreos, broken into fourths (do not crush)
Directions:
Preheat oven to 350 degrees. Cream butter and both sugars. Beat in vanilla and egg. Add baking soda, salt, baking powder and cream of tartar and beat well. Add the flour and mix until well-blended. Stir in the M&M’s, chocolate chips and cookies. Using a heaping teaspoon, drop the cookies about 2 inches apart onto cookie sheets. Bake for 13-15 minutes.
Friday, October 10, 2008
The Cream of the New York Crop
We all have a certain bakery or café that we know makes the absolute best chocolate chip cookie or brownie or cheesecake; these are our “go to” places where we bring friends from out of town and where we head when we have a craving not just for something sweet, but for that very specific recipe that we’ve tried over and over again.
Sunday, October 5, 2008
Yes, Life is Sweet
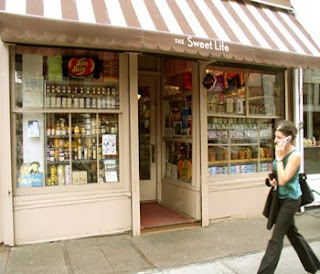
The Sweet Life is a candy and gourmet chocolate family owned retail shop and has apparently been a landmark on the on the Lower East Side for the past 25 years. I can see why this would be true; the first thing that struck me upon entering this tiny store was the strong aroma of chocolate and sugar that had permeated the air. Next, I looked from corner to corner and saw clear jars filled with chocolates and jelly beans, stacks of finely wrapped chocolate bars, tins of tea, containers overflowing with nuts and dried fruits, scales and metal scoopers, tiered displays of chocolate candies, bottles of sweeteners and spreads...well, I could go on and on. I have no problem admitting that this tiny shop gave me a brief vision of what my personal heaven could be.
The second wave of adoration for The Sweet Life came later, when I tried their milk chocolate covered raisins. Now, I've been patronizing candy shops since I was little, always delighting in filling the small plastic bags with bulk candy from the plastic bins, and generally choosing at least one small handful of chocolate covered raisins. Every other chocolate covered raisin I've ever eaten pales in comparison to the rich, creamy, and properly sweetened chocolate of these raisins. I found out that they have their own chocolate machines, and while I could not extract any kind of recipe from the gregarious young shop keeper, I knew at first taste that this was a product of true quality. And continuing with the idea of high-quality ingredients, I was also thrilled to pick up a small container of Valrhona cocoa power. A product of France, Valrhona chocolate is supposed to be amongst the very, very best in the world. When purchasing the cocoa, the shop keeper urged me to try some in hot chocolate, which I believe I'm now required to do. The rest will be going into a batch of brownies which ought to be the best I've ever baked, I'm sure. Just having spent several minutes in this store, I feel that my weekend on the whole has been a success. But now I slightly worry: how many other wondrous New York City candy and chocolate shops am I missing?
The Sweet Life
63 Hester Street
New York, NY 10002
Thursday, October 2, 2008
Super Easy Cinnamon Raisin Quickbread
Despite its ease and its versatility, I always seem to forget about my Cinnamon Raisin Quick Bread. Basically, it’s a bread that the baker can make as healthful or unhealthful as he or she wishes, a bread that almost anything can be added to, a bread that works well in the morning as a fast breakfast and, of course, in the evening as a tea-time companion.
The best thing about this bread is that it is easy enough to whip up on a whim. And, if you’re anything like me, then you already have all the ingredients you need on hand. I like to let the bread cool quite a bit before eating, though, otherwise it’s too crumbly to fully enjoy.
Cinnamon Raisin Quick Bread
Ingredients:
2 ½ cups whole wheat flour
1 cup sugar
1 ¼ cup skim milk
2 egg whites
2 ½ tsp. baking powder
1 tsp. salt
1 tsp. cinnamon
½ tbsp. vegetable oil
1 cup raisins
1 tbsp. ground flax seed
Directions:
1. Mix together all ingredients in a large bowl.
2. Pour into a greased and floured loaf pan.
3. Bake for about 1 hour at 350 degrees.
Sunday, September 28, 2008
Back to School with Peanut Butter Cookies
I may be slightly tardy on the whole “back to school” thing (it’s been a few years now since I’ve been “back to school”), but I don’t think it matters how long you have been out of the classroom. When September comes around, the blustery days arrive, and shiny red apples are numerously displayed on every grocery cart, and that feeling of a new start comes rushing back. There is some seriousness to it: as in, what a fun summer, now back to the “real” work. However, what I enjoy is the sensation of change, of starting anew. Of course that comes with the springtime, as well, and a bit more logically, but even still. To me, autumn is another turn in the cycle, and I like to welcome it now with the same traditions that I’ve carried from my grade school days.
Nothing engulfs me with a wave of nostalgia like food does. That’s why it’s around September when I like to pull out the apples, the peanut butter, the oats, the caramel, the macaroni & cheese … all of these foods remind me of the first days returning to school, and I’m pleased that these memories are not ones of terror. Perhaps the food aided as a comfort when returning to a routine after the laziness of summer, but if that’s the case, then it seems even more necessary to utilize their characteristics to help usher in the surprisingly chilly and overcast Fall that we’ve already begun to experience in New York.
So when I found a recipe that combined both peanut butter and oats (two lunchbox cookie staples), I decided to play around with some of the ingredients and came up with the super simple recipe below.
The cookies come out of the oven crisp and flavorful, tasting strongly of peanut butter. The oatmeal gives a unique texture to the cookies, and the wheat bran adds some healthfulness without detracting from the overall taste.
Peanut Butter Oatmeal Cookies
Yield: About 4 dozen
Ingredients:
1 cup butter, melted
3/4 cup packed brown sugar
3/4 cup granulated sugar
1 tsp. vanilla extract
1 cup peanut butter
2 eggs, beaten
1 1/4 cups all-purpose flour
1 cup wheat bran
3/4 cup rolled oats
2 tsp.baking soda
Directions:
1. Preheat oven to 350 degrees F (175 degrees C).
2. In a large bowl, beat together the butter, brown sugar, granulated sugar,vanilla, peanut butter and eggs. In a separate bowl, mix the flour,bran, oats, and baking soda. Slowly stir the flour mixture into the butter mixture until smooth. Drop by rounded teaspoons onto an ungreasedcookie sheet.
3. Bake for 14 to 17 minutes. Remove to a wire rack to cool.
Sunday, September 21, 2008
Cheesecake filled Thumbprints
Anyway, to the point: I have quite a thing for thumbprint cookies. What I love most about them is how adaptable they are: there is a seemingly endless list variations and, thus, ways to get creative. I've made peanut butter and jelly thumbprints, brownie thumbprints, lemon thumbprints. There are date fillings and pecan topped and the standard jelly-filled butter cookie types. At my house growing up, we always had the jelly-filled type, which I've since come to regard as the “classic” thumbprint, and it wasn't until later in my baking career (and recipe research) did I see that versatility is this cookie's best quality.
This is why I was so excited to see, in Martha Stewart's Cookies, a new twist that had never occurred to me: Cheesecake Thumbprints. Now that I've seen it from Martha, it seems like such an obvious idea. The cheesecake flavor pairs well with so many other forms of desserts (like brownies and ice cream), so why not put it into a thumbprint? When I read through this recipe, it seemed pretty basic, but I made a couple of changes to the ingredients for the filling, only because I have a bit of a love for different sorts of cheeses, and pairing them together with other foods. Once, in New York, I had a spectacular cone of gelato: Marscapone flavored. Because this particular cheese works so well when used in desserts, I thought it would be an interesting experiment to try it in place of the cream cheese. It certainly made for an amazing cheesecake filling with a mild taste. However, I found the filling to be slightly overshadowed by the buttery strength of the base cookies. When I make these in the future, I'll be sure to roll the cookies smaller and attempt to make larger wells.
Still, though, these are a very delicious and novel cookie, which I found satisfying enough after enjoying only one.
Cheesecake Thumbprints
Yield: About 3 dozen
Ingredients:
8 ounces cream cheese, softened
½ cup granulated sugar
1/8 plus ¼ teaspoon salt
2 large egg yolks
1 ½ teapsoon sour cream
¼ teaspoon vanilla
1 cup unsalted butter, softened
2 cups all-purpose flour
Directions:
1. In a mixing bowl, beat the cream cheese until light and fluffy for about three minutes. Beat in ¼ cup sugar and 1/8 tsp. salt until smooth. Mix in one egg yolk, sour cream and vanilla. Cover and put in the refrigerator for 30 minutes.
2. Preheat oven to 350 degrees.
3. In a large mixing bowl, beat together butter, ½ cup sugar and ¼ tsp. salt until creamy and combined. Mix in the last egg yolk until well-incorporated. Gradually add flour and mix until combined.
4. Scoop out level tablespoons worth of the dough and roll into balls. Place balls onto parchment-lined or greased baking sheets. Using the handle end of a thick wooden spoon, or your finger, make an indentation in the center of each ball.
5. Place into the oven and bake for 10 minutes. Remove from the oven and carefully use your thumb (or the end of the same wooden spoon) to press the middle of the cookies, remaking the indentations. Place cookies back into the oven, rotating them from their original position, and continue to bake until slightly golden around the edges, about 7 minutes.
6. Remove cookies from the oven and fill the indentations with the cheesecake filling. Place back into the oven and bake for about 8 more minutes, until the filling is set. Remove from the oven and transfer cookies to a wire rack to cook completely. When cool, place cookies into the refrigerator to chill before serving.
Wednesday, September 17, 2008
Chocolate Coconut Oatmeal Cookies
Although coconut often gives baked goods a summery, tropical feeling, in these oatmeal cookies, it only adds to its substance. I must give the newest issue of Cooking Light it's due for providing me with the recipe; I must admit, reading through this magazine every month gives me a great amount of pleasure. I'm not big on magazines in general, but the foodie ones have a special place in my heart, and have never failed to disappoint. I always find either a new recipe to add to my ever-expanding lexicon or an explanation of some technique that I have yet to try (what precisely is braising?).
But of course, I'm not attempting to sell a subscription to anyone. I suppose that while some people cannot pass up the newest issue of People or Glamour, one can walk into my apartment and find a plethora of cooking magazines, all dog-eared and marked up, simply waiting for me to open them and find my next delectable dessert.
Yield: 2 dozen cookies
Ingredients:
1 cup all-purpose flour
½ tsp. baking powder
¼ tsp. baking soda
¼ tsp. salt
½ cup packed brown sugar
6 tbsp. granulated sugar
¼ cup butter, softened
1 large egg
¾ teaspoon vanilla extract
¼ cup flaked sweetened coconut
¼ cup finely chopped dark chocolate
Cooking spray
Directions:
1. Preheat oven to 350°.
2. Lightly spoon flour into a dry measuring cup; level with a knife. Combine flour, oats, baking powder, baking soda, and salt; stir with a whisk.
3. Place sugars and butter in a large bowl; beat with a mixer at medium speed until well blended (about 2 minutes). Add egg, beating well. Beat in vanilla. Add flour mixture to butter mixture; stir just until combined. Stir in coconut and chocolate.
4. Scrape dough onto a lightly floured surface, and divide into 24 portions. Roll each portion into a ball. Place 12 balls on each of 2 baking sheets coated with cooking spray; flatten slightly with the heel of your hand. Bake, 1 sheet at a time, at 350° for 15 minutes or until the tops are set and cookies are lightly browned on the bottoms. Remove cookies from pan; cool on wire racks.
Sunday, September 7, 2008
Chocolate Cake unlike the 13x9" variety
And of course, since another form of enlivenment for me is baking, I tend to scan the cooking section of the bookstore on a weekly basis, checking for any appealing titles. This week did not disappoint. I really should have no shame in saying that I've been waiting for Nigella Lawson's “How to be a Domestic Goddess” cookbook to appear in the store; even though I would not simply go to a bookstore and buy the book full price, I've been fetishizing it for some time. Part of this is due to the title: I do want to be a goddess of this variety, one who has an artillery of recipes for every occasion, all mouth-watering and luscious. Another part is due to the fact that I think Nigella is an extraordinary woman and baker (I suppose in order to support her, I should have just bought the book retail. Oh, well). Though she has not been trained as a chef, she brings her personal style of enjoyment to her cooking shows and her cookbooks: for her, food is a pleasure and it is meant to be savored, not endured. She cares about the method and the final product, all with a relaxed attitude that many uptight chefs would benefit from. Also, she initially worked in publishing, which is why I relate to her beyond the love of cupcakes and the therapeutic nature of cooking.
Needless to say, I'm thrilled to have her cookbook, and I was quite pleased with the dessert I made this weekend. It's a chocolate loaf cake, and it has the simplicity of a quick bread recipe. However, one would never mistake one for the other; this cake is dense and rich. I think that pairing it with vanilla ice cream would make it even better, but it still is an incredibly satisfying dessert on its own.
Chocolate Loaf Cake
Ingredients:
1 2/3 cups dark brown sugar
Wednesday, September 3, 2008
Cran Apple Cider Cupcakes
Unfortunately, I made the decision even more difficult in the afternoon. During lunch, I picked up a dozen cupcakes from Tribeca Treats: my dozen cupcakes, actually. As the winner of the "create a speciatly flavor" contest, I was given a gift of my Cran Apple Cider cupcake with cinnamon icing and candied ginger; since so many of my co-workers supported me in the voting process, and since I really shouldn't have a dozen cupcakes just lying around my apartment, I brought them in for all to share.
The feedback was amazing. Now, I obviously did not make the cupcakes, so I really shouldn't even be taking credit. But, as was pointed out a few times, they were my brainchild. If I do someday open a bakery (I hear Seattle is a nice place for baked goods), then I'll want to start getting creative now.
The cupcakes are, in fact, incredible. The cake tastes, true to its name, like cider and the cranberries give it a welcome tartness. The frosting also pairs well with the cider, with only a hint of cinammon and a marvelous cream cheese consistency. It's the kind of cupcake I can see myself earnestly pairing with a glass of apple cider, perhaps sitting underneath a tree in the park, watching the yellow and red leaves drift to the ground and get carried off with the autumn breeze.
Monday, August 25, 2008
Seven Layers Never Tasted So Good
That was how I felt tonight, when my blue mood forced me to make a decision: watch episodes of The Simpsons online, or get in the kitchen and do something different. Well, after the first three Simpsons episodes, I decided that I should do something for others, hopefully with a delicious result.
Haven't we all tried the Seven Layer Magic Cookie bars at some point? The treat goes by so many different names now, all with different results. I thought I would take what I had in my cupboard and put together my own variation. I won't lie; I was emboldened by my cupcake flavor winning first prize, and I thought that, perhaps, I could throw something together all of my own.
These are not the Magic Cookie bars that you may have enjoyed at bake sales or from your mother's oven. These are an adaptation that I am excited to show my co-workers tomorrow.
Of course, anyone could have put these together. The whole point, I believe, is to try new things and mix in whatever gets your fancy.
I'm just happy that I was able to tonight (and with the butter, is truly is 7 layers!)
Christie's Seven Layer Magic Cookie Bar
Ingredients:
¼ cup unsalted butter
2 cups graham cracker crumbs
½ cup milk chocolate chips
½ cup peanut butter chips
½ cup oats
1 14-oz can sweetened condensed milk
1 1/3 cups shredded coconut
Directions:
1. Preheat oven to 350 degrees F.
2. Melt butter and coat in a 13 x 9 inch pan
3. Spread crumbs evenly over bottom of pan and pat to make a firm crust. Layer chocolate chips, peanut butter chips, and oats over crumbs. Pour condensed milk over the mixture. Sprinkle coconut over condensed milk.
4. Bake for 24-27 minutes, until everything is set. Let cool.
Saturday, August 23, 2008
No Salt, Just Sweet
Most other times, I would decide that a helping of my oatmeal raisin chocolate chip cookies would help, but I know that no amount of sugar is going to chase this rainstorm away, so why bother?
Aside from the gloom, I am pleased, actually, that I’ve reached a point in my baking where I realize that it’s not just the final product that should be savored, but it’s the entire process. I’m no longer baking just in order to reach a final destination, but it’s a fulfilling task that soothes my mind and relaxes my body; it’s absolutely lifting for my soul to stand in front of my counter, feel the warmth of the stove, and have a recipe card staring me in the face. Sure, the end result is important, and clearly it’s the only part that matters to my audience of tasters, but it’s no longer the sole reason I bake.
With this in mind, I decided on a cookie that I would work with a bit more than a drop cookie; something I could put in my hands, and that I could feel and form. And this recipe for fudge cookies truly yields chocolately-delicious results. The cookie, when slightly under-baked, is soft on the inside with slightly harder edges, and the powdered sugar enhances and adds to the unsweetened cocoa powder.
No matter what the recipe, really, a little bit of sweetness at least helps to brighten up a blue day.
Chocolate Cookie Pretzels
Ingredients:
2/3 cup butter or margarine, softened
1 cup sugar
2 teaspoons vanilla extract
2 eggs
2-1/2 cups all-purpose flour
1/2 cup unsweetened cocoa
1/2 teaspoon baking soda
1/4 teaspoon salt
Powdered sugar
Directions:
1. Heat oven to 350°F. 2. In a large bowl, stir together flour, cocoa, baking soda and salt. In a separate bowl, beat butter, granulated sugar and vanilla. Add eggs and beat well. Gradually add flour mixture to butter mixture, beating until well blended. 3. Divide dough into 24 pieces. On lightly floured surface, roll each piece with hands into thin strips, about 12-inches long. Place strip on ungreased cookie sheet. Twist into pretzel shape and place about 2 inches apart on cookie sheet. 4. Bake 7-8 minutes. Cool 1 minute; remove from cookie sheet to wire rack. Cool completely. Sprinkle with powdered sugar.
Friday, August 22, 2008
My Award-Winning Cupcake, now a Specialty Flavor at Tribeca Treats!
Recently, Tribeca Treats held a contest to determine their newest “Specialty Flavor” that would be featured in rotation at the bakery. Participants were asked to create a cupcake flavor detailing out the type of cake, the frosting, and any toppings. The winning cupcake would be added to their menu for all to enjoy. Naturally, I entered the competition.
I was excited when I learned that my flavor was a semifinalist, flabbergasted when I heard that it was a finalist, and overjoyed to hear that it won first prize!The contest was an absolute joy to participate in from the tasting perspective as well; for four days, the bakery held taste-testings of each of the semifinalist, then finalist flavors, allowing for customers to rate each cupcake. There was some very solid competition, and I think we all enjoyed sampling an array of uniquely flavored miniature cupcakes, all exquisitely made by the bakery.
After the tasting, and especially after the results, I was – and am – quite proud of my invention. I submitted an Apple Cider cupcake with cinnamon frosting and a bit of candied ginger as a topping.
Growing up in Connecticut, where orchards and farmer’s markets are in no short supply, I’ve been savoring apple cider donuts every autumn since I was a child; I couldn’t think of a more seasonal and mouth-watering flavor for a cupcake, and I’m glad that now so many people are able to get a taste of it themselves.
If you live in the
I can guarantee, there will be more coverage of the Apple Cider cupcake to come.
Thursday, August 14, 2008
You Really Can Doodle a Snicker
Snickerdoodles
Ingredients:
2 3/4 cups all-purpose flour
2 teaspoons cream of tartar
1 teaspoon baking soda
1/4 teaspoon salt
8 tablespoons unsalted butter
1/2 cup pure vegetable shortening
1 3/4 cups sugar
2 tablespoons ground cinnamon, plus more if needed
2 large eggs
Directions:
1. Preheat the oven to 400 degrees and grease baking sheets.
2. Sift together flour, cream of tartar, baking soda, and salt. In a large bowl combine butter, shortening, and 1 1/2 cups sugar. Beat on medium speed until light and fluffy, about 2 minutes. Scrape down sides of bowl. Add eggs, and beat to combine. Add dry ingredients, and beat to combine.
3. In a small bowl, combine remaining 1/4 cup sugar and the ground cinnamon. Form the dough into small balls and roll in cinnamon sugar. Place about 2 inches apart on the prepared baking sheets. Bake until the cookies are set in center and begin to crack (they will not brown), about 10 minutes. Transfer the sheets to a wire rack to cool about 5 minutes before transferring the cookies to the rack.
Sunday, August 10, 2008
Almost as easy as pie
Actually, the preparation was not exceedingly difficult, but I also did not create an ideal pie. The blueberry filling was a breeze, and it turned out perfectly: sweet enough, but not too much to overwhelm the fruit flavor. The crust, on the other hand, is something that I apparently need to work at a bit more. It was slightly buttery and browned, but it crumbled where it should not have, making for a pie that could hardly support itself. And, if this were for a party or a gift, I would have taken more care when rolling out the dough on the plastic wrap, and also cutting the dough for the lattice top; mine was a bit messy.
In the end, the feedback was all positive. I made this for my family, and each of them agreed that it was absolutely scrumptious, if not heavy on the blueberries (which, in reality, is not a criticism). As summer berry recipes go, it was quite fun to try, and I'm proud that I was able to face the trepidation of making a pie without the safety net of a pre-made crust or a filling that comes from a can. This recipe is nothing to fear at all, and I daresay that I've gained the confidence to take another look at some of the pie recipes that I scoffed at earlier, thinking that it would simply be too much work. After all, the work of it is the enjoyable part!
As us bakers know, there's something so satisfying about creating an entire dessert from scratch: digging our hands in the dough, meticulously measuring out each ingredient, sampling the smallest spoonful along each step, and finally removing a finished product from the oven, fragrant and hot, then offering it up to others as if it were a finely executed work of art.
Lattice-Topped Blueberry Pie
Ingredients:
Crust: 1 1/2 cups all-purpose flour, divided 1/2 cup ice water 1 1/2 teaspoons sugar 1/4 teaspoon salt 4 1/2 tablespoons butter Cooking spray
Filling: 1 cup sugar, divided 3 1/2 tablespoons cornstarch 1/8 teaspoon salt 6 cups fresh blueberries 1 1/2 tablespoons butter or stick margarine, melted 3/4 teaspoon vanilla extract
Directions:
1. To prepare crust, spoon flour into dry measuring cups; level with a knife. Combine 1/4 cup flour and ice water, stirring with a whisk until well-blended. Combine 1 1/4 cups flour, 1 1/2 teaspoons sugar, and 1/4 teaspoon salt in a bowl; cut in butter with a pastry blender or 2 knives until mixture resembles coarse meal. Add ice water mixture; mix with a fork until flour mixture is moist.
2. Gently press two-thirds of dough into a 4-inch circle on heavy-duty plastic wrap; cover with additional plastic wrap. Roll dough into a 12-inch circle. Press remaining dough into a 4-inch circle on heavy-duty plastic wrap; cover with additional plastic wrap. Roll dough into a 9-inch circle. Freeze both portions of dough 10 minutes. Working with larger portion of dough, remove 1 sheet of plastic wrap; fit dough into a 9-inch pie plate coated with cooking spray. Remove top sheet of plastic wrap.
3. To prepare the filling, combine 3/4 cup plus 3 tablespoons sugar, cornstarch, and 1/8 teaspoon salt in a bowl, and sprinkle over blueberries. Toss gently. Stir in butter and vanilla. Spoon blueberry mixture into crust.
4. Preheat oven to 375°.
5. Remove top sheet of plastic wrap from remaining dough. Cut dough into 6 (1 1/2-inch) strips. Gently remove dough strips from bottom sheet of plastic wrap; arrange in a lattice design over blueberry mixture. Seal dough strips to edge of crust. Place pie on a baking sheet covered with foil. Sprinkle lattice with 1 tablespoon sugar.
6. Bake at 375° for 1 hour and 15 minutes or until crust is browned and filling is bubbly. Cool on a wire rack.
Tuesday, July 29, 2008
Bites of chocolate peanut butter bliss
Chocolate Peanut Butter Chip Cookies
Ingredients
1 cup butter
1 1/2 cups sugar
2 eggs at room temperature
2 teaspoons vanilla extract
2 cups all-purpose flour
2/3 cup unsweetened cocoa powder
3/4 teaspoon baking soda
1/2 teaspoon salt
2 cups peanut butter chips
Directions
1. Preheat oven to 350 degrees F.
2. In a medium bowl, combine the flour, cocoa, baking soda and salt. In a second medium bowl, cream together the butter and sugar. Blend in the eggs and vanilla and then blend in the flour mixture. Finally, fold in the peanut butter chips. Drop cookies by teaspoonfuls onto the prepared cookie sheets.
3. Bake for 8 to 10 minutes in the preheated oven, until set. Cool on wire racks.
Tuesday, July 22, 2008
Berry Strata
To say that the heat of New York City was unbearable this past weekend hardly gives a full impression of just how hot the sun was, how heavy the air was, how the temperature reached unhealthy levels and forced many into the artificial air conditioning of whatever store or café was nearest. It was horribly, disgustingly hot, and the mere act of breathing was an unpleasant chore.
These are the summer days that are so easy to forget about when, in the midst of a cold February, one wistfully imagines July days spent lakeside drinking lemonade and dipping strawberries into freshly-made whipped cream. These fantasies do not transition into reality in New York City, or if they do, I certainly have never seen them.
No matter the weather, though, summertime is a lovely time to sample all the fruits that the season has to offer (even if certain recipes use the frozen variety of said fruits). Which is why I decided to brave the oven and try this recipe for a mixed berry strata. I, of course, stayed far away from my kitchen while this was baking, but once the strata cooled and I took a bite, I decided that it was well worth it.
Stratas are generally considered a brunch dish, which are usually made with layers of ingredients placed over a base of bread and cheese and baked in an oven. These components are found in this dessert strata, as well. The final result is something less cohesive than a pie or a tart, as there is no crust, and once plated, looks similar to a crumble.
I brought it into my office, and one person told me that it reminded him of the French Clafouti, with a custard-like consistency (in order to achieve this, make sure that you use both whole milk and ricotta). Other co-workers were pleased with the berry tartness combining with the sweetness of honey and juice.
Berry Strata
Ingredients:
2 tbsp. butter3 tbsp. honey
4 large eggs
1/2 cup whole milk ricotta
3 tbsp. sugar
1 cup whole milk
1/4 cup orange juice
4 slices of bread, torn into 1-inch pieces (about 4 cups)
1 16 oz. bag frozen mixed berried, thawed and drained
Directions:
1. Melt the butter in a small saucepan over low heat. Turn off the heat, add the honey, and stir to combine.
2. In a large bowl, beat the eggs. Then combine with the ricotta and sugar. Add the milk, orange juice, butter and honey mixture, and bread. Stir to combine. Gently fold in the berries.
3. Place the ingredients in a 10-inch round baking dish. Cover with plastic wrap and refrigerate for at least 2 hours, up to 12 hours.
4. Preheat the oven to 350 degrees F. Bake the strata until golden on top and baked through, about 40 minutes. Let stand 5 minutes before serving. Spoon into dishes and serve.
Tuesday, July 1, 2008
Rice Krispies Tiffins
When I was in
Ingredients:
1 (10 oz.) package regular marshmallows - or -4cups mini marshmallows
6 cups Rice Krispies® cereal
1 (8 oz.) jar caramel ice cream topping
3 cups milk chocolate chips
Wednesday, June 25, 2008
Lemon Spice Chocolate Chip Cookies
That's the kind of reaction I like out of my cookies, though; and not to brag, but the foot traffic through my work area was pretty heavy the other day, as was the praise following the first bite of these cookies. Actually, I should just credit the recipe, which I found and adapted slightly from Mrs. Fields and her vast wisdom of cookie-dom. The most surprising thing, I was told by my co-workers, was the hint of spice in these otherwise straightforward cookies: the cumin mixes well with the tartness of the lemon and the sweetness of the chocolate, making for a unique and delicious taste. Soft-baked and small, it's possible to eat a whole cookie in one bite, allowing all of the flavors to work together.
I was quite happy to bring the joy of Mrs. Fields into the office, considering what pleasure it gave me to bake these cookies over the weekend. As is the case, I'm sure, for so many around the city and the country, a good part of my Sunday routine has been given over to cooking; I make a large batch of my meals for the week and divide it into day-by-day portions; I peel and chop vegetables and wash fruit so that I'll have something to snack on; and, inevitably, I bake some sort of dessert that I will later share amongst my co-workers or my friends (however the week turns out).
Maybe this seems overly domestic, maybe it sounds positively dull, but for me, nothing is more relaxing and rejuvenating, and nothing begins my week as solidly, than a kitchen full of fresh, fragrant food. And the memory of having a table top covered with cooling cookies, the scent of lemon rising with the heat, is most definitely helping me get through this week.
Lemon Spice Chocolate Chip Cookies
Ingredients:
2 cups all-purpose flour
1/2 teaspoon baking soda
1 teaspoon cumin
1 1/2 sticks (3/4 cup) salted butter, softened
1 cup granulated sugar
2 eggs
1 1/2 teaspoon lemon extract
1 1/2 cups mini chocolate chips
Directions:
Preheat oven to 325 F.
1. In a medium bowl whisk together flour, baking soda, and cumin; set aside.
2. In a large bowl cream butter and sugar with an electric mixer at medium speed.
3. Add eggs and lemon extract, and beat well. Blend in the flour mixture. Stir in the chocolate chips.
4. Drop dough by teaspoons onto ungreased cookie sheets, 1 1/2 inches apart. Bake for 14 - 15 minutes. Do not allow tops to brown. Immediately move cookies to a wire rack to cool.
Sunday, June 15, 2008
WTF at our advertising
There are certain teachers who one will have the pleasure of encountering over the course of a lifetime, whether it’s the third grade teacher with long brown hair and a taste for gold pins attached to her lapel, or the woman whose lecture you sincerely anticipated, despite the start time of 10:00 a.m. Dr. Andersen was this latter professor, who never could recall my name, even though I had taken a total of three of her classes over two years, who once asked a student in the front row for a pen because she couldn’t find hers in her bag.
Her classes on media studies truly gave my eager undergrad eyes a perspective upon the world that I hadn’t thought of before—and what student does not wish for this precise thing in a professor?
Before this one specific class called “History and the Culture of Advertising,” I had looked upon billboards and magazine ads with a fleeting shrug. But when I was able to take a more thorough examination of what we are subjected to each and every day, and its subconscious ramifications, I feel as though my perspective of our American culture and everything that comes along with it did shift.
When I was in
Because I would never, ever have seen this billboard in
In the
And then there's the ad of the diet plan, in the
Now, I really don’t want to get overly political, or talk about any specific interest group (cough, young American women who develop eating disorders and who are constantly being shown images in magazines, t.v shows, and commercials of skinny 96 pound women with the cursory tagline of how desirable they are and with instructions on how to become just like them.)
But when I saw this billboard, I immediately saw how a woman of her—what? Curviness? Size? Proportions?— would not have gotten her picture up there if she were living over here (
Also, I just love this guy staring hungrily at the stick woman in her apartment...because, unless we're all on The Special K Diet, where is our allure, really?
Sadly, I know the answer is not simple, and it's something that one girl in Brooklyn will not be able to answer or to change the circumstances of, though she might desperately want to.
Maybe I should have just written an email to jezebel.com, but I'm riding on the hope that this is an appropriate vehicle of outrage, as well.
If not, please do let me know.